What Happens When You Don’t Service Your Car or Change the Engine Oil on Time?

When life becomes hectic, and the car appears in good condition, you ask yourself, “What’s another couple of weeks?” However, neglecting oil changes and car maintenance for an extended period may result in more costly and significant damage than you may anticipate.

It’s crucial to understand the consequences of skipping routine maintenance, whether you’re new to car ownership or simply trying to extend the interval between services.

Review the consequences of delaying or skipping an engine oil change or planned servicing.

Why Engine Oil Matters So Much

Engine oil

Consider engine oil to be an essential part of your vehicle’s engine. It helps ensure smooth operation, lubricates moving parts, prevents overheating, and removes impurities.

Without routine maintenance, oil deteriorates over time and loses its ability to perform its function. Oil that is dirty or deteriorated can cause significant engine issues, such as:

  • Increased friction between parts.
  • Overheating.
  • Accumulation of carbon deposits and sludge.
  • Decreased lifespan and efficiency of the engine.

In short, the longer you go without an oil change, the higher the risk of long-term damage.

What Skipping a Car Service Means

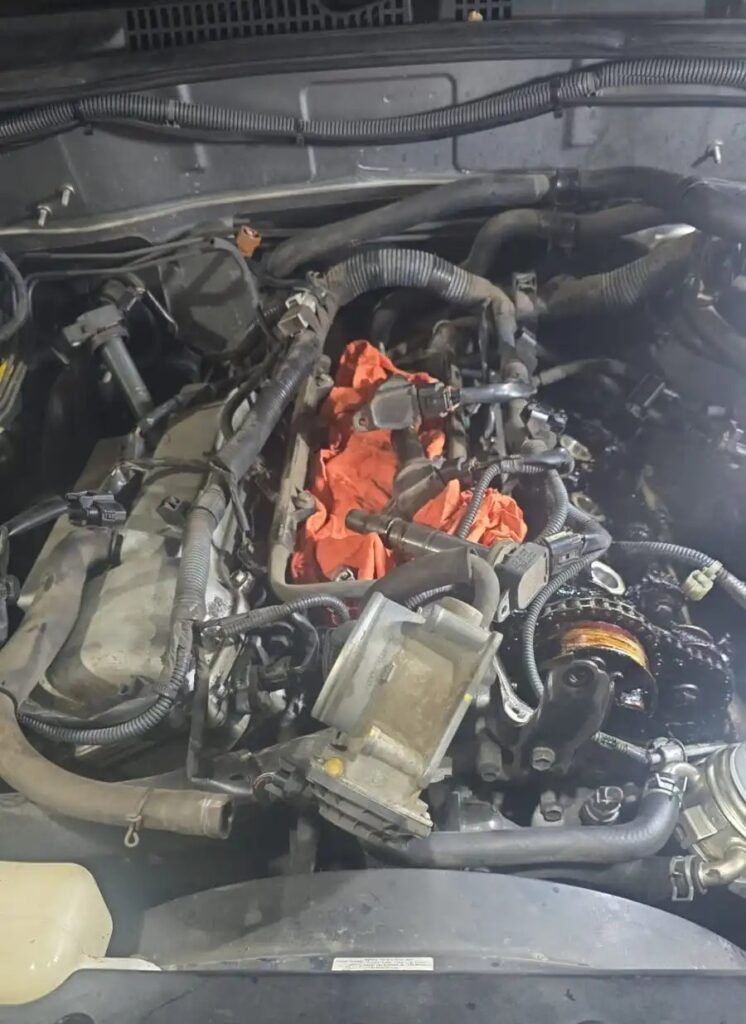
A standard car service involves more than just changing your oil. Mechanics inspect and replace various parts to maintain your car’s safe and effective operation.

Here’s what might be neglected when you miss a booked  service:

  • Treadwear and tyre pressure.
  • Brake pads and fluid levels.
  • Battery condition.
  • Suspension and steering systems.
  • Cabin and air filters.
  • Transmission, differential, and coolant fluids.
  • Spark plugs, hoses, and belts.

If these systems aren’t routinely inspected and maintained, minor problems can become significant (and expensive) fixes.

Consequences of Not Changing Engine Oil on Time

Let’s look in more detail at the potential consequences of delayed oil changes:

1. Engine Wear and Tear

Internal engine components experience less wear and friction when oil is used. Over time, unserviced oil thickens and loses its lubricating properties. This can cause internal damage and speed up the wear process.

2. Poor Fuel Economy

Fuel usage increases when an engine that is not maintained correctly has to work harder to accomplish the same task. You may be filling up more frequently than usual.
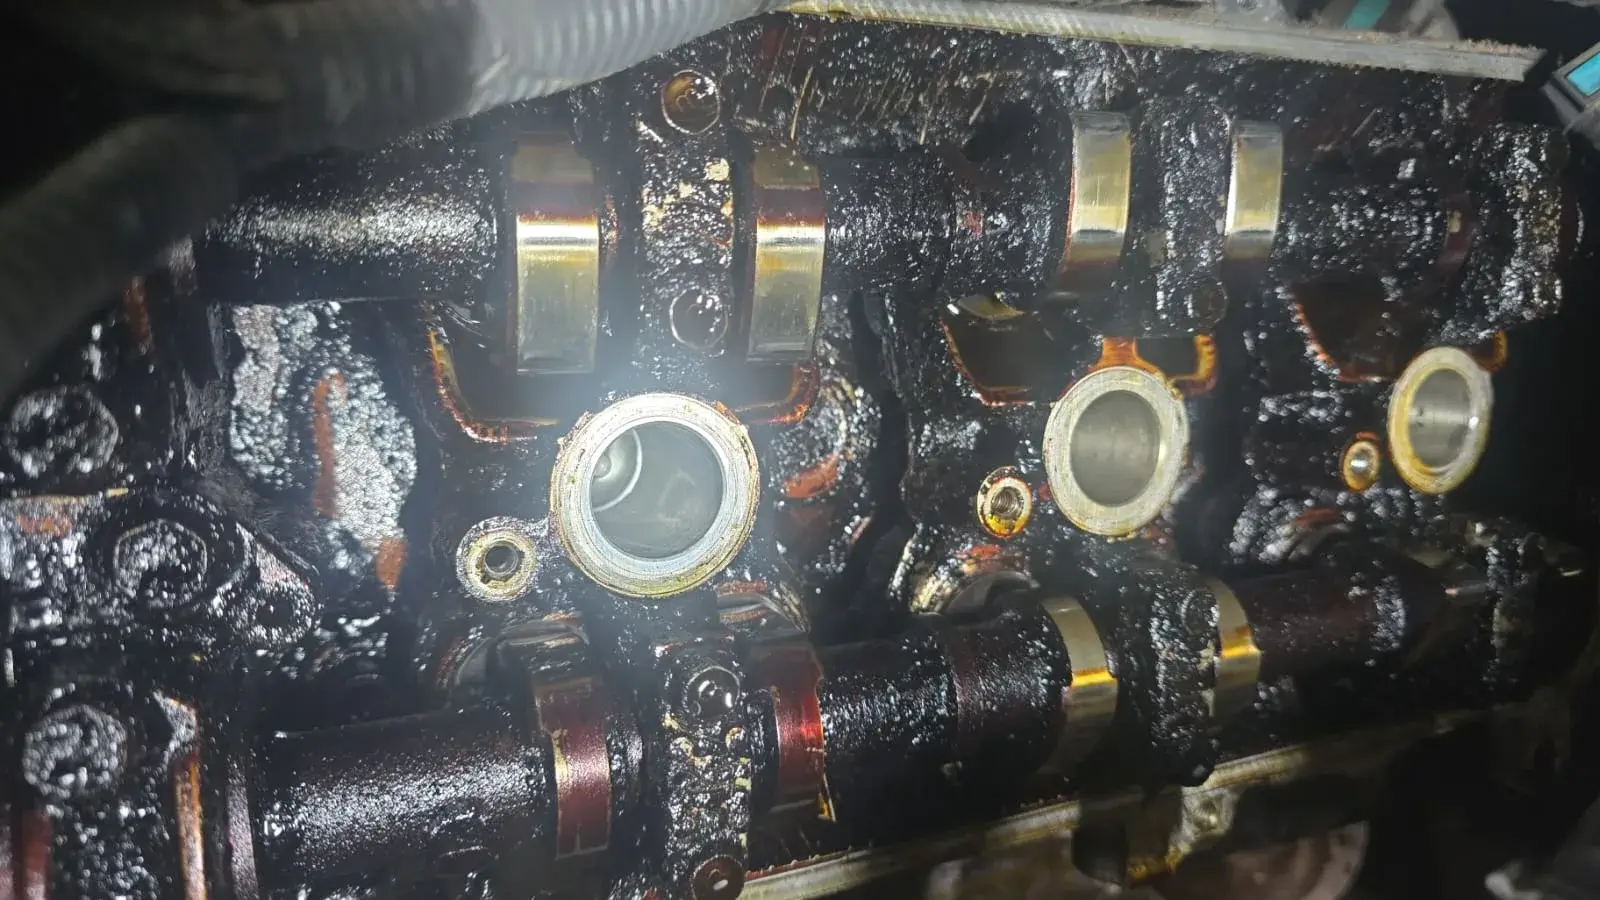
3. Sludge Build-Up

Engine channels get blocked with thick sludge from old, unclean oil. This limits the oil flow and may deprive essential engine parts of the lubricant they require, increasing the chance of engine failure.

4. Overheating

Your engine may overheat without adequate lubrication and cooling from clean oil, particularly in the sweltering Australian summer months or in stop-start traffic. Heat can damage gaskets and seals and cause engine parts to twist.

5. Engine Seizure

Degraded oil will not provide sufficient protection if left unattended for an extended period. An engine breakdown may result from this. Repairs can be unfeasible or cost more than the car is worth.

Signs You've Waited Too Long Between Services

Your car may begin to display warning indications if you’ve missed your last logbook service or if you’ve ignored the oil change light:

  • The engine’s ticking or knocking noises.
  • Too much exhaust smoke.
  • Engine performance decline.
  • Your dashboard’s warning lights.
  • The smell of burning oil within or near the car.

It’s a good idea to schedule a service as soon as you see any of these. Even if your car appears to be “fine,” hidden problems may develop.

Impact on Warranty and Resale Value

Skipping routine maintenance can void your vehicle’s warranty, even if the manufacturer still covers it. The majority of warranties require prompt maintenance according to the logbook schedule.

Think about reselling even if you don’t care about the warranty. A thorough service record helps preserve the value of your car and gives prospective purchasers peace of mind that it has been well-maintained. Service record gaps might cause concerns and reduce the market value of your vehicle.

How Often Should You Change Engine Oil?

Most manufacturers advise changing engine oil every six to twelve months or every 10,000 to 15,000 kilometers, whichever comes first. However, this depends on your driving conditions, the type of oil you use, and the make and model of your vehicle. 

When driving regularly in urban traffic or Australia’s harsher conditions, your car should be serviced more frequently. For specific guidance, see your mechanic or the owner’s manual.

The Cost of Skipping vs Servicing

Delaying an oil change or car repair service may seem cost-effective, but it will ultimately cost you more. The cost of emergency repairs is frequently higher than that of routine upkeep. 

For example:

  • The cost of an oil change could be less than $150.
  • But it might cost thousands to refurbish or replace an engine.
  • A few hundred dollars could be spent on a routine service that detects worn brake pads early.
  • If you ignore it for too long, you can end up with broken calipers or rotors, which would be far more expensive.

Conclusion

Timely car service and routine engine oil changes are more than just “good maintenance”; they are crucial safeguards for your investment. Over time, a seemingly harmless delay may result in expensive repairs, decreased performance, or even engine failure.

Whether driving through Adelaide’s city streets or taking a lengthy road trip, you can ensure your car operates smoothly, safely, and effectively by keeping up with scheduled services and oil changes. A little work now could save you hundreds of dollars later.

Ultimately, prevention is always less expensive than treatment, particularly when it comes to car repair.

How Much Does a Wheel Alignment Cost in Adelaide?

If your car isn’t driving as smoothly as usual, there’s uneven tyre wear, or your steering wheel pulls to one side. In addition to making driving more enjoyable, proper wheel alignment helps drivers in Adelaide maintain their cars safely and save money over time.

However, what factors influence the cost of a wheel alignment in Adelaide? Let’s examine it more closely.

Understanding the Alignment Process

An alignment involves changing your car’s suspension system to ensure the wheels align with the manufacturer’s recommendations. Unlike what many people think, the camber, caster, and toe angles—where the wheels meet the road—are what are changed, not the wheels themselves.

When your car’s wheels line up correctly, you’ll enjoy:


  • Better steering responsiveness and handling.
  • Even tyre wear extends tyre life.
  • Increased fuel economy.
  • A smoother, safer ride.

Poor handling, greater tyre wear, and even higher fuel consumption can result from uneven wheels.

What's the Cost in Adelaide?

Although the price of an alignment service in Adelaide might vary based on several factors, it is typically still a reasonably priced component of regular auto maintenance.

1. Vehicle Type

The service is likely to be more economical because smaller passenger cars are typically faster and easier to adapt. However, high-performance cars, SUVs, and 4WDs might need more complicated equipment or time, which could raise the cost a little.

2. Service Level

Usually, there are two choices:

Front-end adjustment: Usually less expensive and perfect for many front-wheel drive cars.
A more thorough service that covers both the front and rear wheels is four-wheel adjustment. This is frequently advised for newer cars and those with independent rear suspensions.

3. The state of the suspension and steering

Before precise changes can be made, replacing any worn or damaged suspension or steering parts on your vehicle, such as ball joints, control arms, or tie rods, might be necessary. This may result in higher labour and component expenses.

4. Workshop Reputation

Although reputable shops in Adelaide with skilled auto mechanics can charge a little more for their services, you frequently get greater value in knowledge, accuracy, and customer service. However, many nearby car repair shops provide affordable prices without sacrificing quality.

When Should You Get It Checked?

Are you concerned about whether your car needs realignment? These common symptoms can indicate it’s time for an inspection:

  • The car is swerving to one side.
  • When going straight, the steering wheel is tilted.
  • Rapid or uneven tyre wear.
  • Tyres that squeak, particularly when turning.
  • The steering seems unsteady or loose.

How Often Should You Get a Wheel Alignment?

Wheel alignment should generally be checked at least once a year or every 10,000 kilometres, whichever occurs first. But you might require one sooner if:

  • You’ve collided with a curb, pothole, or other road obstruction.
  • You’ve had steering or suspension work done.
  • Your tyres were just replaced.
  • You were involved in a little minor accident or bingle.

Over time, keeping your wheels aligned can save you hundreds of dollars on fuel and tyre replacements.

Ways to Save on the Service

Here are some practical ways to reduce the cost of this essential maintenance:

Bundle services: When you combine wheel alignment with tyre care, balance, or logbook servicing, many facilities offer discounts.

Look around: There are several respectable workshops in Adelaide at affordable prices.

Keep up with your maintenance: If your suspension is in good shape, your alignment check will run more smoothly.

Watch for seasonal sales: Some stores run promotions with loyalty programs or at slower times.

What Happens During a Wheel Alignment?

It usually takes 30 to 60 minutes to align a wheel. This is what typically occurs:

  1. A technician examines the suspension and steering parts.
  2. The present wheel angles are measured using specialized equipment.
  3. Adjustments are made to align the wheels properly again.
  4. Specific workshops might provide a report displaying “before” and “after” specifications.
  5. A brief test drive verifies that everything is operating as it ought to.

    Your car’s handling will improve immediately, and your tyres will appreciate it.

Is DIY Wheel Alignment a Good Idea?

In simple terms, no. Wheel alignment needs precise tools and specialized knowledge, even though there are online instructions available. Serious safety hazards and possibly the loss of new tyre or suspension warranty might result from improper modifications. The best and safest action is to trust a trained expert.

Final Thoughts

Wheel alignment is one of the easiest and most economical ways to keep your car safe and operating at peak performance. It is still reasonably priced preventative maintenance in Adelaide, even though the price can vary based on your vehicle, the degree of service, and the facility you select.

Selecting skilled auto technicians in Adelaide guarantees that the work is done correctly the first time, whether you’re scheduling regular maintenance or dealing with particular auto repair issues. The benefits of increased tyre life, fuel economy, and driving safety outweigh the minor outlay.

How to use a car tyre puncture repair kit

Nothing is more annoying than hearing that dreaded hiss of air escaping from your tyre, particularly if you’re far from help. The good news is that you don’t always have to tow your car to the closest auto repair shop or call roadside help when your tyre goes flat. You can quickly get back on the road if you have a tyre puncture repair kit in your boot and a little know-how.

What Is a Tyre Puncture Repair Kit?

A small puncture in a tubeless tyre can be temporarily fixed with a small piece of equipment called a tyre puncture repair kit. Typically, it consists of:

  • Insertion tool
  • Reaming tool
  • Rubber repair strips (also called plugs)
  • Rubber cement (in some kits)
  • Gloves and a cutter

This kit is handy if you’re constantly on the go and can’t get to a car repair immediately. But remember that this is only a short-term solution, and you should get the tyre checked out by a professional as soon as possible.

When Can You Use?

Before we begin, let’s make one thing clear: a tyre puncture repair kit works only on specific kinds of damage. It can be used if:

  • A nail, screw, or similar object causes the puncture.
  • The hole is in the tread area (not the sidewall).
  • The tyre is tubeless.
  • The hole is not too large (usually under 6mm in diameter).

It’s advisable to have professional vehicle repair immediately if the puncture is too large or the sidewall of your tyre is damaged.

How to Use a Tyre Puncture Repair Kit

Step-by-Step:
Step 1: Locate the Puncture
Put your warning lights on and park your car in a secure spot first. To find the puncture, check the tyre. Wait until you’re ready to patch the hole before removing the object if it’s still embedded. If you remove it too soon, the tyre may collapse rapidly.
Step 2: Remove the Object
tyre-2
When you’re ready, take out the nail or screw using pliers or any other instrument you have on hand. Air may flow out quickly, so be cautious.
Step 3: Ream the Hole
tyre-3
Clean and expand the hole using the reaming tool, which resembles a rough, pointed file. Push in and out multiple times after inserting it into the puncture. The hole is prepared for the rubber plug at this stage.
Step 4: Prepare the Plug
Please ensure the insertion tool’s eye is centered by inserting one of the rubber repair strips through it. For improved sealing, apply rubber cement to the strip if it is included in your kit.
Step 5: Insert the Plug
The strip should now only be visible approximately half an inch outside the tyre after pushing the insertion tool into the hole while the strip is inside. It might require some work. After it is in position, swiftly remove the tool, leaving the plug in place.
Step 6: Trim the Excess
Trim the exposed plug flush with the tyre surface using a cutter or scissors. It will fade with time, so don’t worry if it extends a bit.
Step 7: Inflate the Tyre
To inflate the tyre to the appropriate pressure, use a portable air compressor or go to a local gas station. Listen carefully or wash the plug area with soapy water to check for air leaks; bubbles will show a leak.
Step 8: Drive and Monitor

Please drive carefully and monitor the tyre’s behavior until it is filled and steady. With this modification, you should be able to reach your destination or the closest mechanical repairs safely.

Important Safety Tips

  • As crucial as a spare tyre, always keep your tyre puncture repair kit in your car.
  • Don’t put off visiting a reputable auto repair facility if you have any doubts regarding the quality of the work.
  • Never try to use these kits to fix enormous blowouts or sidewall punctures.
  • The patch is not a replacement for a genuine, long-term solution, even though it might last a while.

Final Thoughts

A tyre puncture repair kit is a simple yet powerful tool that can save the day when facing a flat tyre. You can maintain composure, take charge of the situation, and get back on the road swiftly and safely if you know when and how to utilize it. Even though this type of repair is quite helpful in an emergency, a professional inspection should always come after it to guarantee your car’s long-term safety.
Being ready with the appropriate equipment and information is a component of responsible vehicle ownership. Understanding how to deal with small problems like a puncture can make a big impact, whether you’re traveling vast distances or commuting every day. You never know when you might need your gear, so always have it close at hand, drive carefully, and remain vigilant.

How to repair leather interior car

Leather interiors give every car repair a sense of smoothness and luxury. But with time, they may experience deterioration, fading, cracks, and scratches. In addition to preserving its visual attractiveness, leather interior car repair helps improve the driving experience. In this post, we’ll look at efficient ways to fix leather car interiors so your automobile keeps its immaculate appearance. 

Understanding Common Leather Damages

It’s crucial to recognize the various types of damage that leather interiors commonly suffer before beginning the repair process: 

  • Surface Scratches and Scuffs: These are surface imperfections that affect the top layer of leather and are frequently caused by friction or contact with sharp objects.
  • Cracks and Tears: These damages cut deeper into the leather, creating an uneven surface, and are brought on by extended usage, exposure to sunshine, or lack of conditioning.

Fading and Discoloration: Leather may lose its original color and brilliance after prolonged exposure to sunlight.

Essential Tools and Materials

The following supplies are needed to fix the leather interior of your car:

  • Leather Cleaning Agent: Leather Cleaning Agent: A pH-neutral cleanser made especially for leather in cars. 
  • Leather Conditioner: Protects and hydrates the leather after restoration. 
  • Leather Repair Kit: Usually consists of applicators, colorants, and filler components.
  • Soft Microfiber Cloths: To polish and clean the leather’s surface. 
  • Rubbing Alcohol: Used to clean and get the damaged area ready for repair.
  • Fine-Grit Sandpaper: To smooth out applications for filler.
  • Masking Tape: To keep the surrounding surroundings safe while repairs are being made.

Step-by-Step Repair Process

  1. Thorough Cleaning: Vacuum the leather surface first to remove any loose dirt or debris. After that, a gentle cloth is used to apply the leather cleaning solution to eliminate any last traces of impurities. Make sure everything is totally dry before continuing. 
  2. Assess the Damage: The repair strategy will be guided by the amount of damage, which may be evaluated by looking at the cleaned area. 
  3. Surface Preparation: To guarantee that repair materials attach properly to fractures or tears, lightly wipe the area with rubbing alcohol.  
  4. Applying Leather Filler: Apply the leather filler from your repair kit to the damaged area with an applicator or spatula. As the manufacturer directs, apply the filler in thin layers, letting each layer dry. 
  5. Sanding the Repaired Area: After the filler has dried completely, use fine-grit sandpaper to lightly sand the area to create a smooth, even surface that merges perfectly with the surrounding leather. 
  6. Color Matching and Application: Mix the color of your leather to match the colorant that comes with your repair kit. Using a sponge or applicator, evenly apply the colorant to the fixed area, then let it completely dry. 
  7. Conditioning the Leather: Use a premium leather conditioner on the entire seat once the colorant has dried. In this process, moisture is restored, suppleness is improved, and a barrier against further damage is created. 

Preventive Maintenance Tips

  • Regular Cleaning: Use the proper leather cleaners to clean your leather seats every few weeks to avoid dirt buildup and possible discoloration.
  • Consistent Conditioning: Every three to four months, condition the leather to keep it soft and hydrated, avoiding dryness and cracks. 
  • Sun Protection: To reduce exposure to direct sunshine, which can promote fading and drying, use sunshades or park in shady spots. 
  • Immediate Spill Management: Spills should be cleaned immediately by wiping the area with a fresh cloth to avoid damage and stains.

Conclusion

The leather interior of your car can be easily repaired and maintained, improving the look and longevity of the vehicle. You can keep the comfort and luxury leather interiors offered by following the suggested procedures and implementing routine maintenance procedures. However, it is best to get professional help if the damage is substantial or unsure about the repair process. We at Sai Mechanical Repairs provide thorough best auto services to guarantee your car gets the best care possible. 

How Long Do Car Batteries Last? Lifespan & Maintenance Tips

The power required to start your engine and run your essential systems depends mainly on your car’s battery. However, it has a lifespan as well. Unexpected assaults can be avoided by being aware of a battery’s lifespan and identifying symptoms of degradation. Essential details regarding battery life, the variables that impact battery life, and when to replace your battery are covered in this article. 

How Long Does a Car Battery Last and What Affects Its Lifespan?

The average lifespan of an automobile battery is three to five years, though a number of variables might shorten or lengthen that time.

  1. Weather: While high heat speeds up fluid evaporation and extreme cold lowers battery performance, both can cause premature failure.
  1. Driving Practices: Short trips frequently keep the alternator from charging the battery completely, which can lead to early failure.
  1. Electrical Drain: Overnight use of headlights, radios, or interior lighting can drain the battery, shortening its lifespan.
  1. Alternator Problems: A broken alternator reduces the battery’s lifespan by improperly charging it.
  1. Terminal Corrosion: Battery performance may be impacted by corrosion on the battery’s terminals, which can harm electrical connections.
  1. Battery Maintenance & Quality: Reputable brands produce high-quality batteries with longer lifespans. Routine checks, terminal cleaning, and ensuring the battery is fully charged can extend a battery’s lifespan beyond five years.

How to Know If You Need a New Car Battery

By identifying the early warning symptoms of a failing car battery, you can prevent unplanned damage and maintain the dependability of your vehicle. The following are the main signs to watch out for:

  1. The engine is not working well. Your battery may die if your car’s engine starts more slowly than usual or performs poorly.
  1. The engine doesn’t start, but the car accessories do. You might observe that the headlights or radio turn on when you turn the key, but the engine doesn’t start. This can indicate that the battery isn’t strong enough to start the engine.
  1. Periodic issues with charging. The battery in your automobile can be weak and unable to maintain a consistent charge if the engine works well one day but not the next.
  1. The dashboard’s battery indicator light. A battery charge level indicator light is a standard feature on the dashboard of many contemporary cars. If it remains on, this light may indicate a battery or charging system issue.
  1. Electrical problems and dim headlights. Your car’s electrical components may not receive enough power from a weak battery, which could result in issues with your infotainment system, dim lighting, or poorly powered windows. 
  1. An old battery (older than three years). The expected lifespan of car batteries is three to five years. Ensure your device is functioning correctly by checking it frequently if it is over three years old.

How to Check a Car Battery

Unexpected battery failures can be avoided with regular battery examinations. Here’s how to find out how well your car battery is doing:

Visual examination

  • Check for corrosion on the battery terminals.
  • Examine for physical damage or leaks.
  • Verify that the battery is fully inserted.

Nominal voltage

  • Measure the battery voltage with a multimeter.
  • When the engine is off, an ultimately charged battery should display a voltage of 12.6 volts or above.
  • The battery may discharge if the voltage falls below 12.4V.
  • The voltage should range from 13.7 V to 14.7 V while the engine operates.

Assessment of load

  • To check whether the battery sustains the necessary voltage when under load, a qualified mechanic can conduct a load test.

Examine the charging system

  • To ensure proper charging, examine the alternator and electrical system if the battery frequently loses charge. 

Conclusion

You can avoid unplanned malfunctions and expensive car repairs by being aware of the lifespan of your car battery and identifying early warning indications of failure. Although most batteries survive three to five years, their lifespan is greatly influenced by a number of factors, including maintenance, driving patterns, and weather. You can keep an eye on the condition of your battery with routine inspections that include visual inspections, voltage readings, and load evaluations. It might be time for a replacement if you observe weak charging, electrical problems, or delayed engine starts. You can guarantee a dependable and functional vehicle by remaining proactive.

Things You Need to Know Before Changing a Flat Tire

 Experiencing a flat tire can be frustrating and stressful, especially if you are on the road or in a hurry. However, knowing how to change a tire can save you time and keep you safe. This guide will provide you with everything you need to know before changing a tire, including essential safety measures,tyre repair service, tools, step-by-step instructions, and when to seek professional help.

1. Ensure Safety First

Before attempting to change a tire, your safety should be your top priority. Taking proper precautions can prevent accidents and injuries. Here’s what you need to do:

Find a Safe Location

  • As soon as you notice a flat tire, do not panic. Slowly reduce your speed and look for a level, straight stretch of road with a wide shoulder, a parking lot, or a designated pull-off area.
  • Avoid stopping on curves, hills, or near busy traffic, as this can be dangerous.
  • If you are on a highway, drive slowly to the nearest exit rather than stopping on the shoulder if possible.

Turn on Your Hazard Lights

  • The moment you realize you have a flat tire, turn on your hazard lights to alert other drivers that you are slowing down and may be stopping.
  • It’s especially crucial at night or in bad weather conditions where visibility is low.

Apply the Parking Brake

  • After stopping, engage your parking brake to prevent your vehicle from rolling while changing the tire.
  • Please add an extra layer of safety, especially if you’re on a slight incline.

Use Wheel Wedges

  • Place wheel wedges (or heavy objects like bricks or rocks) behind the tires opposite to the flat one.
  • It helps prevent movement while the car is lifted.

Avoid Working on the Roadside Without Protection

  • Set up reflective warning triangles or flares a few meters behind your vehicle to warn other drivers.
  • Wearing a reflective safety vest can also help you be more visible, especially at night.

2. Gather Essential Tools

Changing a tire requires a few key tools, and it’s good practice to keep them in your car at all times. Here’s what you’ll need:

Must-Have Tools

  • Spare Tire: Ensure it is properly inflated and in good condition.
  • Car Jack: Used to lift the vehicle off the ground.
  • Lug Wrench: For loosening and tightening the lug nuts.
  • Owner’s Manual: Provides specific instructions related to your vehicle’s tire-changing procedure.

Additional Useful Items

  • Flashlight and Extra Batteries: Essential for nighttime tire changes.
  • Gloves: Helps keep your hands clean and protected.
  • Tire Pressure Gauge: Ensures the spare tire is properly inflated before driving.
  • Wooden Block (2″x6″): Placing this under the jack provides extra stability on soft or uneven ground.

3. Step-by-Step Guide to Changing a Tire

Now that you’re prepared, follow these steps to replace your flat tire safely:

Step 1: Remove the Hubcap or Wheel Cover

  • If your car has a hubcap covering the lug nuts, use the flat end of the lug wrench or a screwdriver to pry it off carefully.

Step 2: Loosen the Lug Nuts

  • Using the lug wrench, turn each lug nut counterclockwise about a half-turn to loosen them.
  • Do not fully remove them yet—this should only be done once the car is lifted.

Step 3: Position the Jack and Lift the Vehicle

  • Locate the jack point near the flat tire (refer to your vehicle manual for the exact location).
  • Place the jack securely and pump or crank it until the tire is about 6 inches off the ground.

Step 4: Remove the Lug Nuts and Tire

  • Fully unscrew the loosened lug nuts and keep them in a safe place so they don’t roll away.
  • Carefully pull the flat tire straight off the wheel bolts and set it aside

Step 5: Mount the Spare Tire

  • Align the spare tire with the wheel bolts and push it into place.
  • Hand-tighten the lug nuts as much as possible before lowering the vehicle.

Step 6: Lower the Vehicle and Tighten the Lug Nuts

  • Lower the car until the spare tire touches the ground, but don’t put full weight on it yet.
  • Use the lug wrench to tighten the lug nuts in a crisscross (star) pattern to ensure even pressure.

Step 7: Fully Lower the Car and Double-Check Everything

  • Lower the vehicle completely and remove the jack.
  • Ensure all lug nuts are tightened securely to prevent wobbling while driving.
  • Reattach the hubcap if applicable.

4. Post-Tire Change Considerations

After installing the spare tire, there are a few more things you need to do:

Check the Tire Pressure

  • Use a tire pressure gauge to check if the spare tire is inflated properly.
  • If it’s underinflated, drive slowly to the nearest auto service to fill it up.

Drive Cautiously and Replace the Spare ASAP

  • Spare tires, especially donuts (temporary spares), are not designed for long-term use.
  • Drive at moderate speeds and visit a tire repair shop or tire fitting service in Adelaide to get a proper replacement as soon as possible.

5. Preventative Measures to Avoid Flat Tires

To reduce the chances of dealing with a flat tire in the future, consider these maintenance tips:

Regular Tire Inspections

  • Check your tires for cracks, bulges, or uneven wear at least once a month.
  • Look for nails, glass, or sharp objects that may have punctured your tires.

Maintain Proper Tire Pressure

  • Keeping your tires inflated to the recommended PSI improves safety, fuel efficiency, and tire lifespan.
  • Many gas stations and car repair shops provide free air pressure checks.

Rotate Your Tires Regularly

  • Tire rotation ensures even tread wear, reducing the risk of premature flat tires.
  • Typically, you should rotate your tires every 5,000–7,500 miles.

When to Call the Experts: The Importance of Professional Tyre Fitting Services Adelaide with Sai Car Mechanic

If you find yourself stranded with a flat tire, get help from a professional’s safest and most efficient solution. Sai Car Mechanic offers expert tire repair, replacement, and tyre fitting services Adelaide that ensure your vehicle is road-ready with minimal hassle.

Professional Tyre Fitting for Maximum Safety

  • Their skilled technicians ensure that your new tires are correctly mounted, balanced, and inflated, improving vehicle performance and safety.
  • A professional fitting prevents common issues like uneven tire wear, loose lug nuts, or poor road grip.

Wide Range of High-Quality Replacement Tyres

  • If your tire is beyond repair, we offer a variety of premium and budget-friendly tires to suit different vehicles and driving conditions.
  • They supply trusted brands with warranties, ensuring durability and long-term performance.

Mobile Tyre Fitting for Convenience

  • Don’t have time to visit a workshop? We offer mobile tire fitting services, so they come to your home, workplace, or roadside location.
  • It saves you the trouble of driving on a damaged tire or waiting for a tow truck.

Comprehensive Vehicle Safety Check

  • Unlike a DIY tire change, a professional mechanic inspects your vehicle for hidden issues like:
    • Wheel misalignment
    • Brake system problems
    • Worn-out suspension components
  • Detecting these issues can prevent future breakdowns and costly repairs.

Transparent Pricing and Affordable Services

  • Many people hesitate to call a professional because of cost concerns, but Sai Car offers competitive pricing with no hidden charges.
  • Their services are cost-effective, ensuring you get high-quality artistry without breaking the bank.

Expert Advice and Customer Support

  • Which type of tire is best for your vehicle? Our experienced team provides expert recommendations based on your driving habits, vehicle type, and budget.
  • They offer honest advice on whether your tire needs a repair or full replacement, helping you make an informed decision.
  • Their friendly customer support ensures you receive clear explanations, prompt responses, and reliable service every time you need assistance.

Fast and Reliable Service

  • Nobody wants to be stuck on the roadside for hours. Sai car mechanics are known for quick response times and efficient service, minimizing your downtime.
  • Their professionals arrive fully equipped, ready to change or repair your tire on the spot.
  • Whether it’s at your home, workplace, or in the middle of the road, their team ensures hassle-free and efficient service.

Conclusion

Knowing how to change a tire is an essential skill that can save you time and trouble in emergencies. However, prioritizing safety, carrying the right tools, and seeking professional help when necessary are crucial aspects of responsible vehicle maintenance.

By following these steps and practicing regular tire maintenance, you can minimize the chances of getting stranded due to a flat tire.

Why Sai Car is the best mechanics in tyre fitting service

The tyres on your car are essential for overall driving joy, performance, and safety. Selecting the right experts for the task is crucial, regardless of whether you require a tyre replacement, repair, or full wheel alignment. We at Sai Car repair are proud to be the best option for tyre fitting services that Adelaide drivers rely on. But what makes us different? Take a closer look at why Sai Car is the best technician for all of your tyre needs. 

1. Unmatched Expertise in Tyre Fitting Service

Our highly skilled mechanics at Sai Car have years of expertise working on tyres of all brands and models. Our professionals guarantee the ideal fit, balancing, and alignment for a smooth driving experience. 

Precision Equipment and Techniques

To ensure precision in our tyre fitting service Adelaide, we utilize cutting-edge machinery. Our state-of-the-art alignment tools and balancing machines guarantee your vehicle operates smoothly, minimizing uneven wear and increasing fuel economy. 

2. Complete Tyre Repair Services

It’s not always necessary to replace a damaged tyre. Our expert team assesses the condition of your tyre and provides tyre repair Adelaide solutions that are cost-effective and reliable. 

Our areas of expertise include:

  • Repairing punctures carefully, patching tiny holes and leaks.
  • Repairing beaded and rim damage involves making sure the right seal is in place for the best results.
  • Checking and adjusting tyre pressure can increase tyre life and safety.

3. Quick and Efficient Tyre Change Service

Our quick tyre change service guarantees that you can get back on the road hassle-free, regardless of whether you’re dealing with worn-out tyres or an unexpected flat. We offer: 

  • High-quality tyres from top manufacturers.
  • Expert alignment, balancing, and mounting.
  • Professional guidance on choosing the best tyre for your vehicle and driving requirements. 

4. Sai Car Offers More Than Just Tyre Services

To maintain your car in top shape, we provide a wide range of car repair and maintenance services. Among our areas of competence are:

  • Brake maintenance and repairs.
  • Steering and suspension modifications.
  • Changes for batteries.
  • General car maintenance, including oil changes.

Visit Sai Car for a one-stop shop experience and allow our experts to handle all of your automobile needs expertly.

5. Customer-Centric Approach & Exceptional Service

What differentiates us is our commitment to client happiness. Our welcoming crew makes sure that everything runs smoothly and without incident as soon as you walk into our workshop. We offer:

  • Clear price and sincere recommendations.
  • Quick turnaround times will enable you to resume driving as soon as possible.
  • Solutions that are specifically suited to your car’s requirements.

6. Convenient Location and Easy Booking

For all of your tyre and auto repair needs, Sai Car is conveniently located in a prominent area of Adelaide. For your convenience, we now provide same-day treatment alternatives and simple online booking. 

Conclusion

Sai Car is the greatest option for tyre fitting service in Adelaide because of its excellent knowledge, cutting-edge tools, and unmatched customer support. Our committed staff is here to make sure your automobile stays in top condition. Our affordable pricing, customer-first philosophy, and extensive service offerings demonstrate our dedication to providing the best possible automobile care. 

How to Repair Car Roof Lining

Over time, a car’s roof lining can start to sag, making the interior look worn out and neglected. This common issue, also known as a headliner problem, happens when the adhesive holding the fabric in place weakens due to heat, humidity, or age. 

A drooping roof lining is not just an eyesore—it can also become a distraction while driving. Fixing this issue promptly will not only restore your vehicle’s interior aesthetics but also ensure a more comfortable and safe driving experience.

Why Does a Car Roof Lining Sag?

A sagging car roof lining happens mostly because the glue holding it up wears out over time. Heat and humidity are the biggest reasons for this. If you live in a hot area, the constant warmth inside your car can soften the adhesive, making the fabric come loose. Moisture can also get into the headliner, weakening the glue even more. Plus, as cars get older, the materials naturally wear down, making sagging more likely.

Understanding the Causes

The primary cause of a sagging roof lining is the breakdown of the adhesive that bonds the fabric to the roof’s backing board. Several factors contribute to this deterioration:

Heat Exposure: Prolonged exposure to high temperatures can weaken the adhesive, causing it to lose its grip. This is especially common in regions with hot climates, where the interior of a parked car can reach extreme temperatures.

Humidity and Moisture: Moisture can infiltrate the headliner, compromising the adhesive’s integrity. This is particularly problematic in areas with high humidity or for vehicles that have experienced water leaks.

Age and Wear: As vehicles age, the materials used in the interior, including the headliner, naturally degrade. The adhesive becomes brittle over time, leading to sagging.

DIY Methods to Repair Car Roof Lining

DIY Methods to Repair Car Roof Lining

For those inclined towards a hands-on approach, several DIY methods can temporarily address:

Using Adhesive Sprays: Specialized headliner adhesive sprays are designed to reattach the fabric to the backing board. To apply:

1.Preparation: Carefully detach the sagging portion of the fabric without causing further damage.

2.Application: Spray the adhesive evenly on both the fabric and the backing board.

Reattachment: Press the fabric back onto the board, smoothing out any wrinkles or bubbles.

3.Steam and Paint Roller Technique: This approach utilizes steam to reactivate the existing adhesive.

4.Steaming: Use a handheld steamer to apply steam to the sagging area, softening the adhesive.

5.Smoothing: Immediately after steaming, use a paint roller to press the fabric back onto the backing board, ensuring a smooth finish without wrinkles.

6.Utilizing Pins or Thumbtacks: As a quick and temporary fix

Placement: Insert pins or thumbtacks into the sagging areas to hold the fabric in place.

Arrangement: For a more aesthetic appearance, arrange the pins in a symmetrical pattern.

Professional Repair Options

While DIY methods offer temporary relief, seeking professional assistance ensures a durable and aesthetically pleasing result. Professionals can provide services such as:

Complete Headliner Replacement: This involves removing the old fabric and adhesive, preparing the surface, and installing a new headliner with high-quality materials.

Partial Repairs: For localized issues, professionals can repair specific sections of the headliner, matching the fabric and ensuring a seamless appearance.

Structural Repairs: If the backing board is damaged, it may require repair or replacement to provide a solid foundation for the headliner.

Professional car repairs not only restore the appearance of the vehicle’s interior but also ensure the longevity of the fix, reducing the likelihood of recurrent issues.

To extend the lifespan of your car's roof lining:

Park in Shaded Areas: Whenever possible, park your vehicle in shaded areas or use sunshades to minimize heat buildup inside the car, protecting the adhesive from heat-related deterioration.

Control Moisture Levels: Ensure that windows and sunroofs are properly sealed to prevent water ingress. Using dehumidifiers or air conditioning can help control interior humidity levels.

Regular Interior Maintenance: Keep the interior clean and dry. Address any spills or leaks promptly to prevent moisture from reaching the headliner.

Use Protective Sprays: Some products are designed to protect interior fabrics from UV rays and moisture. Regular application can provide an additional layer of defense.

Conclusion

Repairing a loose car roof lining is essential not only for maintaining your car’s appearance but also for ensuring a safe and comfortable drive. While DIY methods can offer temporary solutions, they may not provide the durability and finish that professional services ensure. For vehicle owners in Adelaide seeking reliable and high-quality Auto repair services, SAI Mechanical Repairs stands out as a premier choice.

With a team of experienced and certified mechanics, We offer comprehensive automotive services, including expert headliner repairs. Their commitment to quality workmanship and customer satisfaction ensures that your vehicle receives the best care possible. Whether you’re dealing with a sagging headliner or other mechanical issues, provide efficient and effective solutions tailored to your needs.

Don’t let a sagging roof lining compromise your driving experience. Contact us today to restore your vehicle’s interior to its pristine condition.

How to Clean Car Air Conditioning Filters and Improve Air Quality

The air conditioning system in your car does more than keep you cool; it also ensures that the air you breathe inside the cabin is clean and fresh. However, over time, the air conditioning filters can become clogged with dust, dirt, and debris, compromising air quality and the system’s efficiency. Learning how to clean car air conditioning filters is essential for maintaining comfort, promoting good health, and avoiding unnecessary car repair expenses.

In this detailed guide, we’ll walk you through the steps to clean car air conditioning filters, discuss the benefits of regular maintenance, and provide tips to improve your vehicle’s air quality. Whether you’re a DIY enthusiast or prefer to visit an AC car repair shop, this guide covers you.

Understanding Car Air Conditioning Filters

Before diving into the cleaning process, it’s important to understand the role of air conditioning filters in your car. These filters are responsible for:

  • Trapping Dust and Allergens: Filters capture airborne particles such as dust, pollen, and pet dander, ensuring clean air inside the cabin.
  • Maintaining System Efficiency: A clean filter allows air to flow freely, reducing strain on the AC system and improving cooling performance.
  • Enhancing Air Quality: By removing pollutants, the filters contribute to a healthier driving environment.

There are two primary types of air conditioning filters in cars:

  1. Cabin Air Filters: Located behind the glove box or under the dashboard, these filters clean the air entering the cabin.
  2. Engine Air Filters: These filters protect the engine by trapping debris and are separate from the cabin air filters.

This guide focuses on cleaning cabin air filters to improve air quality and optimize your car’s air conditioning performance.

Signs That Your Car Air Conditioning Filters Need Cleaning

It’s not always obvious when your air conditioning filters require cleaning or replacement. Here are some common signs to watch for:

  1. Reduced Airflow: If the AC isn’t blowing air as strongly as it should, a clogged filter could be the culprit.
  2. Unpleasant Odors: A musty or stale smell when you turn on the AC may indicate a dirty filter.
  3. Increased Allergies: If you or your passengers experience more sneezing or allergies, The filters could spread dust and allergens around.
  4. Noisy AC Operation: Unusual noises when running the AC can signal restricted airflow caused by a dirty filter.

Regular maintenance can prevent these issues and save you from costly AC car repair services.

How to Clean Car Air Conditioning Filters

Cleaning your car’s air conditioning filters is a straightforward process that can be done at home with basic tools. Follow these steps to ensure your filters are clean and effective:

Step 1: Gather Your Tools

You’ll need the following items:

  • A screwdriver (if required for accessing the filter)
  • A vacuum cleaner with a brush attachment
  • Mild soap and water
  • A soft brush or cloth
  • A new filter (if replacement is needed)

Step 2: Locate the Cabin Air Filter

  1. Refer to your car’s owner’s manual to find the location of the cabin air filter.
  2. Common locations include behind the glove box, under the dashboard, or near the windshield wipers.

Step 3: Remove the Filter

  1. Access the filter housing by removing screws or clips as instructed in the manual.
  2. Carefully slide out the filter, taking note of its orientation for reinstallation.

Step 4: Inspect the Filter

  1. Check the filter for dirt, debris, and damage.
  2. If the filter is excessively dirty or damaged, it’s best to replace it.

Step 5: Clean the Filter

  1. Use a vacuum cleaner with a brush attachment to remove loose debris from the filter.
  2. For washable filters, rinse them under lukewarm water and gently scrub them with mild soap if needed.
  3. Allow the filter to air dry completely before reinstalling it.

Step 6: Reinstall the Filter

  1. Place the clean or new filter back into the housing, ensuring it’s oriented correctly.
  2. Secure the housing with screws or clips.

Benefits of Cleaning Car Air Conditioning Filters

Regularly cleaning your car’s air conditioning filters offers several advantages:

  1. Improved Air Quality: Clean filters ensure that the air inside your car is free of dust, allergens, and pollutants.
  2. Enhanced Cooling Efficiency: A clean filter allows the AC system to work more effectively, providing better cooling performance.
  3. Reduced Energy Consumption: With less strain on the system, your car’s engine uses less power to operate the AC, improving fuel efficiency.
  4. Prevention of Odors: Regular cleaning prevents the buildup of mold and bacteria that can cause unpleasant smells.
  5. Prolonged System Life: Keeping the filters clean reduces wear and tear on the AC system, minimizing the need for frequent AC car repair.

When to Replace Car Air Conditioning Filters

While cleaning can extend the life of your filters, they will eventually need replacement. Here are some general guidelines:

  • Replace the cabin air filters every 12,000 to 15,000 miles or as the manufacturer recommends.
  • Consider replacing the filter sooner if you frequently drive in dusty or polluted environments.

If you’re unsure, consult a trusted car repair shop for professional advice.

Tips to Improve Air Quality in Your Car

In addition to cleaning the air conditioning filters, follow these tips to maintain fresh and clean air inside your vehicle:

  1. Vacuum the Interior Regularly: Remove dirt and dust from carpets and upholstery to prevent them from circulating in the air.
  2. Use an Air Purifier: Consider using an in-car air purifier to enhance air quality.
  3. Keep Windows Closed: Avoid driving with windows open in areas with heavy traffic or pollution.
  4. Schedule Regular AC Maintenance: Visit an AC car repair shop for routine inspections and servicing.
  5. Avoid Smoking in the Car: Smoking introduces harmful particles and odors that can linger in the cabin.

Common Mistakes to Avoid When Cleaning Air Conditioning Filters

  1. Skipping Regular Cleaning: Ignoring filter maintenance can lead to poor air quality and reduced system efficiency.
  2. Using Harsh Chemicals: Stick to mild soap and water to avoid damaging the filter material.
  3. Reinstalling a Wet Filter: Ensure the filter is completely dry before reinstalling it to prevent mold growth.
  4. Neglecting Professional Help: If you’re unsure about cleaning or replacing the filter, seek assistance from a car repair professional.

Professional AC Car Repair Services

While cleaning air conditioning filters is a simple DIY task, there are situations where professional help is necessary. An experienced car repair technician can:

  • Diagnose and fix issues beyond dirty filters, such as refrigerant leaks or compressor problems.
  • Replace filters with high-quality parts that match your car’s specifications.
  • Perform a comprehensive AC system check to ensure optimal performance.

Conclusion

Learning how to clean air conditioning in car filters is a vital skill for maintaining air quality and ensuring the efficient operation of your vehicle’s AC system. Regular cleaning not only enhances your driving comfort but also prevents unnecessary car repair expenses. Follow the steps in this guide and maintain good habits to enjoy fresh, clean air every time you drive.

Whether you clean the filters or visit an AC car repair shop, taking care of your car’s air conditioning system is an investment in your health and comfort. Keep your filters clean, and breathe easy on every journey.

How to Repair Dents in Car: Mastering Paintless Dent Repair

When it comes to maintaining the aesthetic appeal of your car, one of the most common issues that can arise is a dent. Whether it’s a minor bump from a shopping cart or a more significant collision, dents can take away from your car’s overall look and, if left untreated, potentially decrease its value. One of the most efficient ways to address car dents without compromising the original paintwork is through paintless dent repair (PDR). If you’re asking how to repair dents in a car, mastering this technique can save you time and money while keeping your car looking as good as new.

In this blog, we’ll dive deep into the process of paintless dent repair, how it works, and why it’s becoming the go-to solution for car owners and mechanics alike. We will also explore the various tools and techniques used in PDR, when to choose this method over traditional repairs, and how you can find a reliable car mechanic shop that specializes in this service.

What is Paintless Dent Repair (PDR)?

Paintless dent repair (PDR) is a specialized technique used to remove minor dents and dings from a vehicle’s body without the need for repainting. This method relies on carefully massaging and manipulating the metal from behind the dent to restore its original shape. Unlike traditional car repair methods, which often involve sanding, filling, and repainting, PDR preserves the car’s original paint, making it an attractive option for those looking to maintain the vehicle’s appearance and resale value.

This method is especially effective for small, shallow dents caused by hail damage, door dings, or small collisions. If the paint hasn’t been cracked or damaged, paintless dent repair can often restore your car to its pre-dent condition without leaving any trace of the damage.

How Does Paintless Dent Repair Work?

Understanding how to repair dents in a car with paintless dent repair is essential for anyone looking to maintain the integrity of their vehicle. The PDR process involves a few essential steps that skilled technicians perform with precision:

  1. Assessment of the Dent: A car repair professional will first inspect the dent to determine if PDR is the best option. Factors such as the size, depth, and location of the dent, as well as the condition of the paint, play a significant role in whether PDR is viable.
  2. Accessing the Dent: To effectively push the dent out from the inside, the technician needs to gain access to the panel. This might involve removing interior panels, trim, or even the wheel well liner, depending on the dent’s location.
  3. Pushing the Dent Out: Using specialized tools, the technician will apply pressure to the back of the dented area. They’ll carefully massage the metal to return it to its original shape, gradually working from the edges of the dent toward the center.
  4. Finishing Touches: After the dent is repaired, the technician will use a tapping technique to smooth out the area and ensure the metal is flush with the surrounding surface. This step is essential to make sure there’s no residual evidence of the dent.
  5. Polishing the Surface: Once the dent has been removed, the technician will polish the area to restore the car’s shine and ensure the repair is seamless with the rest of the bodywork.

Benefits of Paintless Dent Repair (PDR)

  1. Cost-Effectiveness: One of the most significant advantages of PDR is its cost-effectiveness. Since there’s no need for paintwork, fillers, or extensive bodywork, the repair costs are generally much lower compared to traditional methods. This makes PDR an ideal option for small dents and dings.
  2. Time-Saving: Traditional dent repair can take several days, especially if paint is involved. PDR, on the other hand, can often be completed within a few hours, depending on the size and complexity of the dent. This makes it a convenient option for busy car owners.
  3. Retaining the Original Paint: Paintless dent repair preserves your car’s factory paint, which can help maintain its value. Repainting an area can sometimes lower the car’s resale value, as it may not match the rest of the car’s finish perfectly. PDR allows the repair to go unnoticed, keeping the vehicle’s appearance consistent.
  4. Environmentally Friendly: Since PDR doesn’t require the use of paints, solvents, or other chemicals, it’s a more eco-friendly solution compared to traditional dent repair methods. This makes it a greener option for those conscious of the environment.
  5. Maintaining Structural Integrity: Because the car’s original paint and metal are left untouched, the structural integrity of the panel remains intact. Unlike traditional repairs, where fillers can weaken the area, PDR maintains the car’s body strength.

When to Use Paintless Dent Repair

Knowing when to choose paintless dent repair over traditional methods is key to saving both time and money. PDR is best used for smaller dents that haven’t caused any damage to the paint. Here are some examples of when PDR is appropriate:

  • Hail Damage: Small to medium-sized dents caused by hail are common and often perfect candidates for PDR.
  • Parking Lot Dings: Dents caused by doors being opened into your car or other minor collisions in parking lots can often be repaired using PDR.
  • Minor Collisions: Dents from minor fender benders that don’t affect the car’s paint or structural integrity are good candidates for paintless repair.

However, if the dent is too large, too deep, or if the paint is cracked or chipped, PDR may not be the best solution. In such cases, traditional body repair methods, such as sanding and repainting, may be necessary.

Tools Used in Paintless Dent Repair

To understand how to repair a dent in a car using PDR, it’s important to know about the specialized tools that are used by professionals. These tools are designed to carefully reshape the metal without damaging the paint:

  • PDR Rods: These long, slender rods are used to push the dent out from behind the panel. They come in various shapes and sizes to access different parts of the car.
  • PDR Hammers and Taps: These hammers are used to tap the metal into place after the dent has been pushed out. They ensure the metal is smooth and flush with the surrounding area.
  • Glue Pulling Kits: For more complex dents, a glue pulling kit can be used to pull the dent out using specialized glue and a pulling tool.
  • Light Boards: Technicians use light boards to get a clear view of the dent’s shape and depth. The light helps highlight any imperfections and ensures the repair is done precisely.

Finding a Car Mechanic Shop Specializing in PDR

If you want to repair a dent in your car using paintless dent repair, finding a car mechanic shop that specializes in this technique is essential. Not all mechanic shops offer PDR, as it requires specific training and expertise. Here’s how to choose the right shop:

  • Look for Specialized Shops: Seek out car repair Adelaide shops that advertise PDR as one of their services. These shops will have experienced technicians who specialize in this technique.
  • Check Reviews and Testimonials: Reading customer reviews and testimonials can help you gauge the quality of service at a car mechanic shop. Look for feedback on the shop’s PDR services specifically.
  • Ask About Certifications: Some technicians are certified in paintless dent repair. Ask the shop if their technicians have undergone PDR training and certification.
  • Get Multiple Quotes: While PDR is generally cost-effective, prices can vary. It’s a good idea to get quotes from several shops to ensure you’re getting a fair deal.

Common Myths About Paintless Dent Repair

Despite its growing popularity, there are still some misconceptions about paintless dent repair. Let’s debunk some of the most common myths:

Myth 1: PDR is Only for Small Dents:
While PDR is most effective for small dents, it can also be used for medium-sized dents, as long as the paint isn’t damaged and the dent is not in a difficult-to-reach location.

Myth 2: It Won’t Work on Deep Dents:
PDR can work on some deeper dents, depending on the location and the extent of the damage. However, if the dent is too deep, it may require traditional repair methods.

Myth 3: PDR Is a Temporary Fix:
Paintless dent repair is a permanent solution as long as the dent is repaired properly. The process doesn’t weaken the metal, and the repair will last for the life of the car.

Conclusion

Learning how to repair dents in a car using paintless dent repair is an invaluable skill for anyone looking to keep their vehicle looking its best. Not only is PDR cost-effective, fast, and environmentally friendly, but it also allows you to preserve your car’s original paint and structural integrity. By understanding how PDR works, knowing when to choose it over traditional repair methods, and finding the right car mechanic shop, you can ensure that your car stays in top condition for years to come.

If you’re dealing with a minor dent and are looking for a reliable and efficient way to repair it, consider choosing paintless dent repair. With the right tools and expertise, your car can be restored to its original condition, all without the need for costly repainting or bodywork.